Google Maps code allows you to display Google maps, interactively, directly on your website.
It allows you to calculate route, distances, see points of interest on the map and addresses, and much more.
Let's see how to install GDPR-compliant Google Maps on your website thanks to MyAgilePrivacy.
Within this article we will refer to style sheets, ids and Javascript functions.
Remember that the code must be customized by adapting it to your website, thus changing where needed the id, function name or css statements.
Warning: on some specific themes or plugins, it is possible that the API version of Google Maps is already in cookieless mode. In other words, it may not be necessary to proceed with preemptive blocking. If the externally called code refers to "maps.googleapis.com" and not "maps.google.com" oppre to "maps-api-ssl.google.com" it is already active in cookieless mode. You can still proceed with preemptive blocking, if you wish and if the theme/plugin configuration allows it, even possibly by intervening on the code.
Otherwise, you are invited to enable the "Google Maps Widget" Cookie, in "necessary" mode.
Solution 1 - automatic scan
You can use the advanced "Cookie Shield" feature.
That mode is capable of automatically detecting this Software, so you simply set the Shield in "Learning" mode, browse the pages of the site, and find the content entered in the already privacy-compliant mode.
Otherwise, you can use manual configuration.
Solution 2 - manual configuration
Please note: This configuration applies to advanced installations, usually used in custom themes or by experienced developers.
Part 1 - include the Google script among the codes subject to consent
To work properly, Google Maps requires loading an external Google script. The code to be called is something like this:

Let us analyze the relevant parameters that make up the called script:
- key: your API Key for using Google Maps.
- callback: the function that is called when the code is loaded. In our example, the function is "initMap." We will see how it will be necessary to include a callback function for proper operation.
We will see in a moment how to write the callback function.
For now, let us continue with the insertion of the script.
Part 2 - Locating the Cookie for Google Maps on the MyAgilePrivacy Cookie List
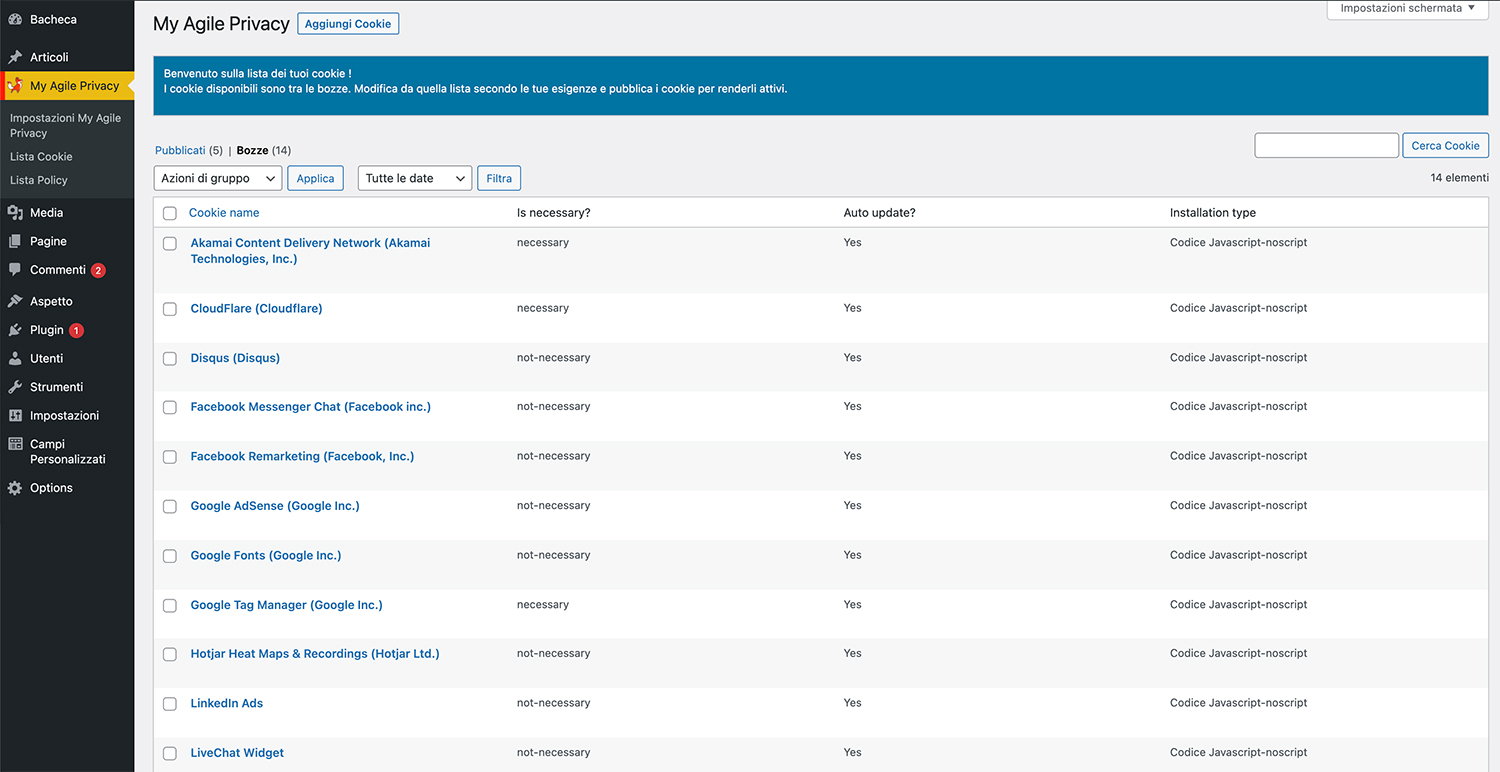
On your WordPress website admin, from the left menu, go to: MyAgilePrivacy -> Cookie List
You will find the list of cookies that were imported when the plugin was installed.
Initially you will see them all in a draft state. You will have to post only the cookies on your website.

On this screen you will see a series of columns:
- Cookie Name: the name of the Cookie
- Is Necessary: indicates whether or not the cookie is essential to site navigation. If rejecting the cookie makes the site unusable, then it is essential. You will find this information pre-filled in the cookie details.
- Auto Update: indicates whether the cookie reference text (which we will see in a moment) remains automatically updated or not. If the setting is on "yes," we will automatically take care of updating the cookie reference texts to keep everything up to date according to GDPR regulations.
- Installation Type: tells you the insertion type chosen for the cookie. This value will be changed depending on the type of inclusion needed, and we will see this together within the guides.
To install the Google Maps cookie, search the list for the one with the title "Google Maps (Google Inc.)" and click on it.
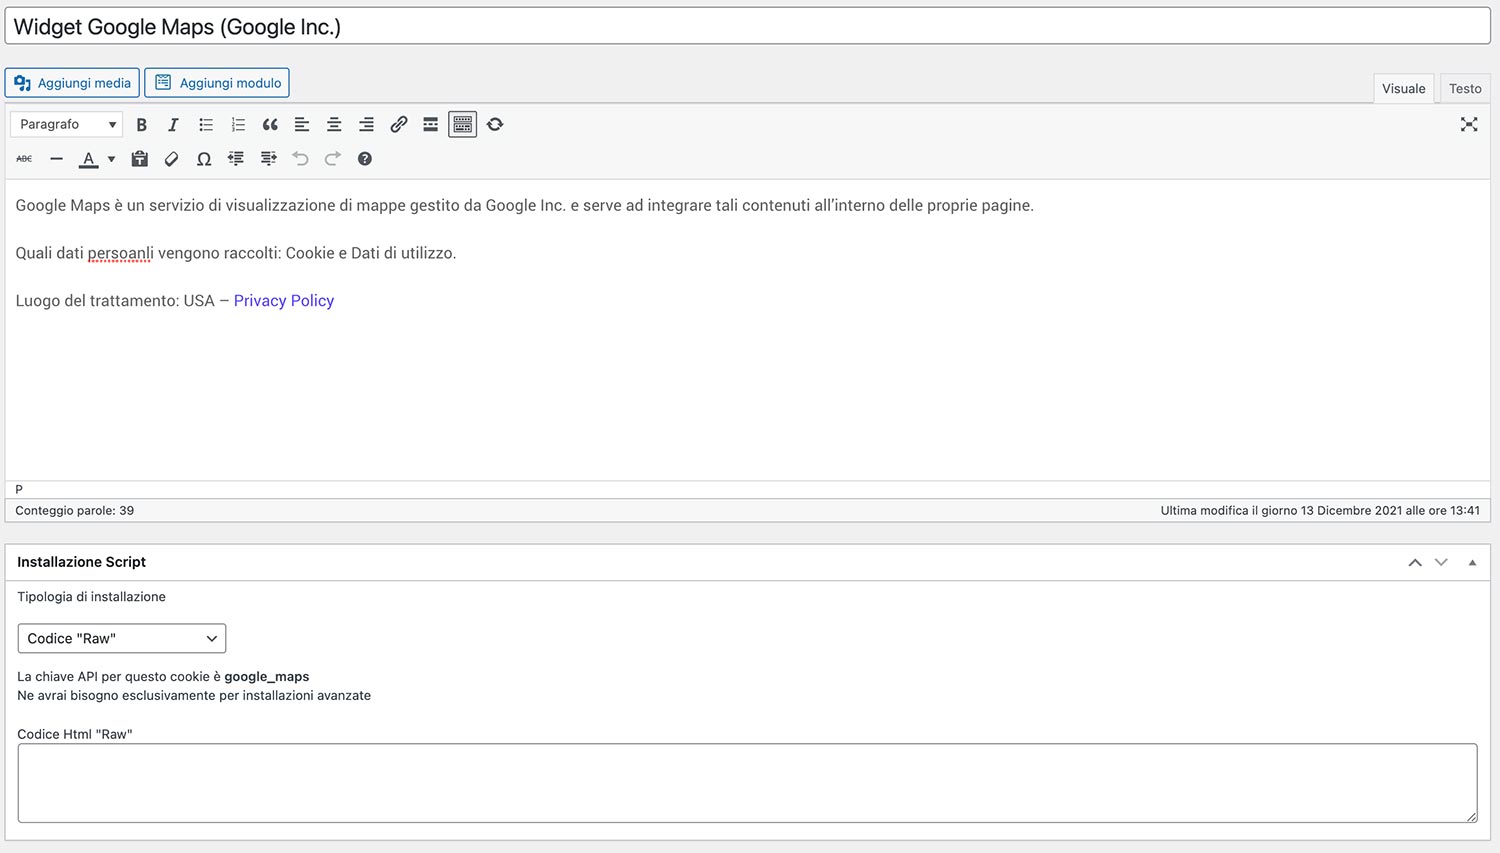
The detail page contains pre-filled informational text and 2 blank fields where the code can be entered.
The pre-filled text is visible in the cookie policy, and it is that information that is automatically updated to be up-to-date and compliant when the "Allow Automatic Update" setting is set to "yes."
Immediately below the text, you will find the option to select the "Type of Installation" (Javascript and Noscript, or Raw).
Select from the "Raw Code" dropdown, and you will see a field called "raw html code."

Part 3 - Entering the Google Maps Inclusion Code
What's left for you to do is to take the Google Maps inclusion code and insert it as is inside the "Html Raw Code" field.
This is what you should see once you enter the code:

Remember to save and publish the Cookie by pressing the blue "Publish" button in the upper right corner.
Part 4 - the Callback Function
As we saw just now, a callback function is also specified in the script, which we called initMap.
Add the function in your javascript file, or in the footer of your template. Here it is:
// Funzione di Inizializzazione della mappa
function initMap() {
// Latitudine e Longitudine del punto centrale
const marker_ltn_lng = { lat: -25.344, lng: 131.036 };

// La mappa si centra sulle coordinate
const map = new google.maps.Map(document.getElementById("map"), {
zoom: 4,
center: marker_ltn_lng,
});

// Il marker posizionato sulle coordinate
const marker = new google.maps.Marker({
position: marker_ltn_lng,
map: map,
});
}
The function sets a set of coordinates, those indicated by marker_ltn_lng. It then renders the map inside a div with map id.
Of course, these values can be customized according to your needs.
Part 5 - the map in html
insert a div with id = "map" where you want the map to be displayed

Important:
the div you just inserted is empty, so without some css, it won't be visible. This css you see below will help you see what is going on (of course you can modify the code to your liking).
#map {
height: 400px;
/* The height is 400 pixels */
width: 100%;
/* The width is the width of the web page */}
Final part - verification of proper operation
Now all you have to do is check whether you have correctly included the Google Map.
When you load the page on your website where you want to display the map, you will see that the map will not load until you expressly give your consent to the installation of the cookie, either by clicking "I agree" on the cookie acceptance bar, or by going to "Customize" and activating the cookie.


