Thanks to Google Ads (formerly Google AdWords) we can show our advertisements to users profiled by us.
Google Ads offers a conversion tracking system to allow you to monitor the effectiveness and return of advertising campaigns.
This type of data is subject to GDPR regulations and the tracking of this data must be authorized by the user.
So let's see how to install GDPR-compliant Google Ads on your wordpress site, thanks to MyAgilePrivacy.
Let's start
The Google Ads setup code consists of 2 distinct parts:
- The first part: linking Ads to the site. It must be installed on all pages of the website.
- the second part: conversion tracking: tracks the actual conversion, and should be installed only on the conversion page (or near the button whose click you want to track)
The conversion tracking code will not work if the link code is not installed on the site.
So, to block cookies and conversion tracking altogether, you will simply need to block the link code, which is exactly what we will focus on in this guide.
You can get the setup and tracking code from your Google Ads account by clicking at the top on tools and settings -> conversions.
If you have not yet created any conversions, start the creation. The procedure is guided, and during the configuration steps you will find yourself defining how to install Google Ads on the site.
Part 1 - finding the code
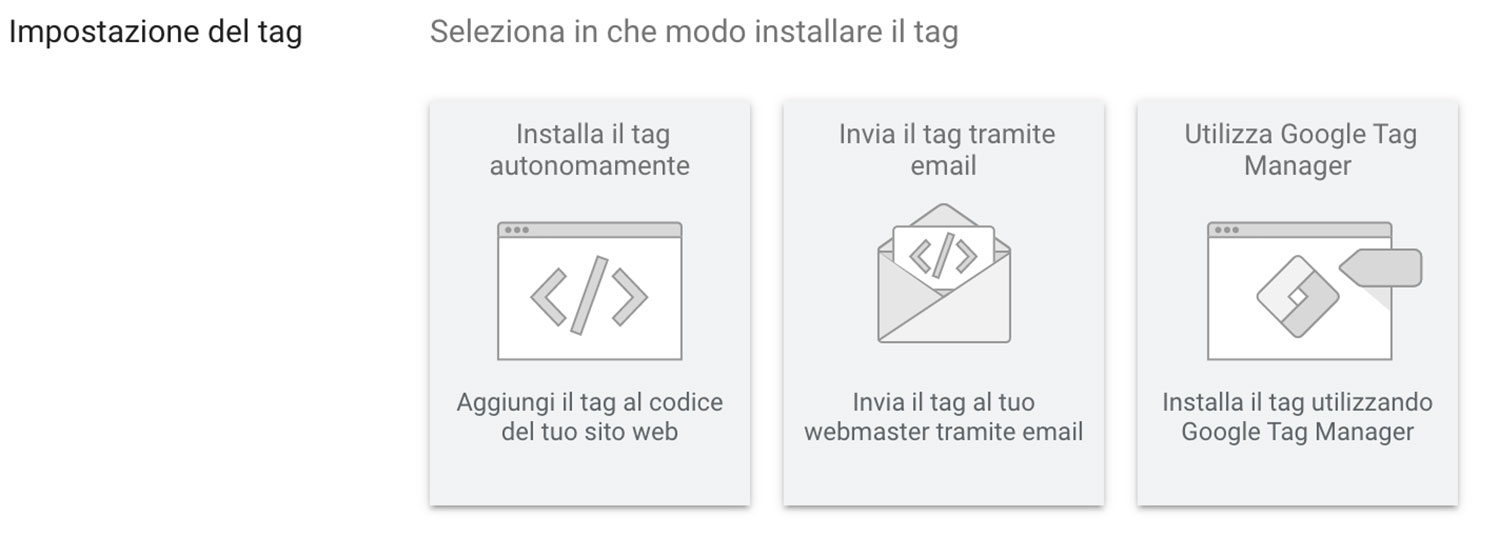
At some point in the procedure of creating the conversion, you will find yourself having to choose how to install the code:

If you choose "install the tag yourself," you will have access to the code to enter on the site.
The possibilities in this case are 2, and Google Ads proposes them to you directly:
- you can install the code from scratch
- you can hook into the Google Analytics code (Universal or 4) if you already have it on the site
We will see in both cases how to do it.
Part 2 - Locating the Cookie for Google Ads on the MyAgilePrivacy Cookie List
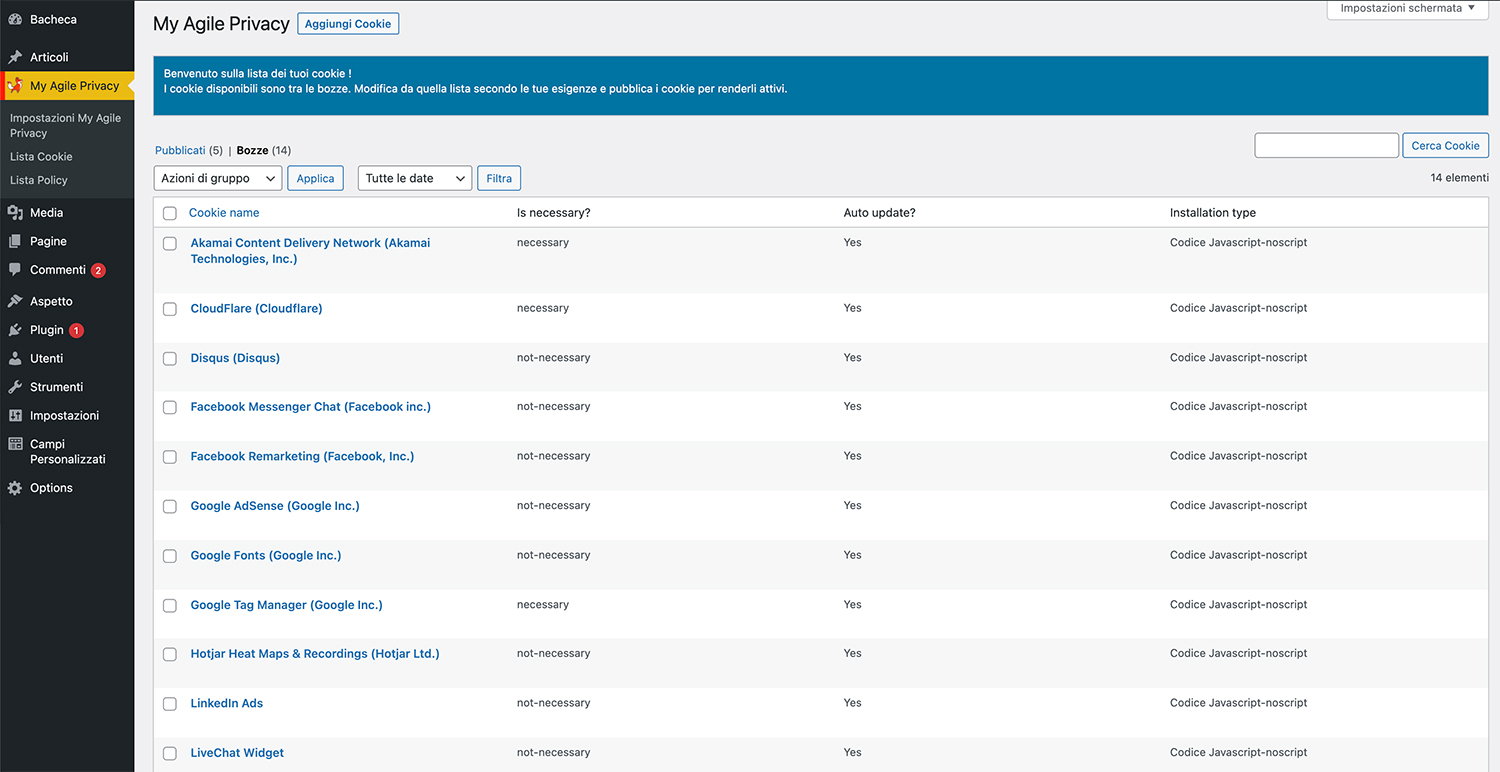
On your WordPress website admin, from the left menu, go to: MyAgilePrivacy -> Cookie List
You will find the list of cookies that were imported when the plugin was installed.
Initially you will see them all in a draft state. You will have to post only the cookies on your website.

On this screen you will see a series of columns:
- Cookie Name: the name of the Cookie
- Is Necessary: indicates whether or not the cookie is essential to site navigation. If rejecting the cookie makes the site unusable, then it is essential. You will find this information pre-filled in the cookie details.
- Auto Update: indicates whether the cookie reference text (which we will see in a moment) remains automatically updated or not. If the setting is on "yes," we will automatically take care of updating the cookie reference texts to keep everything up to date according to GDPR regulations.
- Installation Type: tells you the insertion type chosen for the cookie. This value will be changed depending on the type of inclusion needed, and we will see this together within the guides.
To install the Google Ads cookie, search the list for the one with the title "Google Ads Conversion Monitor (Google Inc.)" and click on it.
The detail page contains pre-filled informational text and 2 blank fields where the code can be entered.
The pre-filled text is visible in the cookie policy, and it is that information that is automatically updated to be up-to-date and compliant when the "Allow Automatic Update" setting is set to "yes."
Immediately below the text, you will find the option to select the "Type of Installation" (Javascript and Noscript, or Raw).
Here the type of installation (whether Js + noscript or Raw) should be selected and the code entered.
Part 3 - the right code for your configuration
Google Ads offers you two different solutions for installation:
- you can supplement the Google Analytics code (universal or 4) with an additional line for Google Ads
- you can install the code from scratch
Which one to choose? It depends on how your website is set up. Let's see how to do it in both cases.
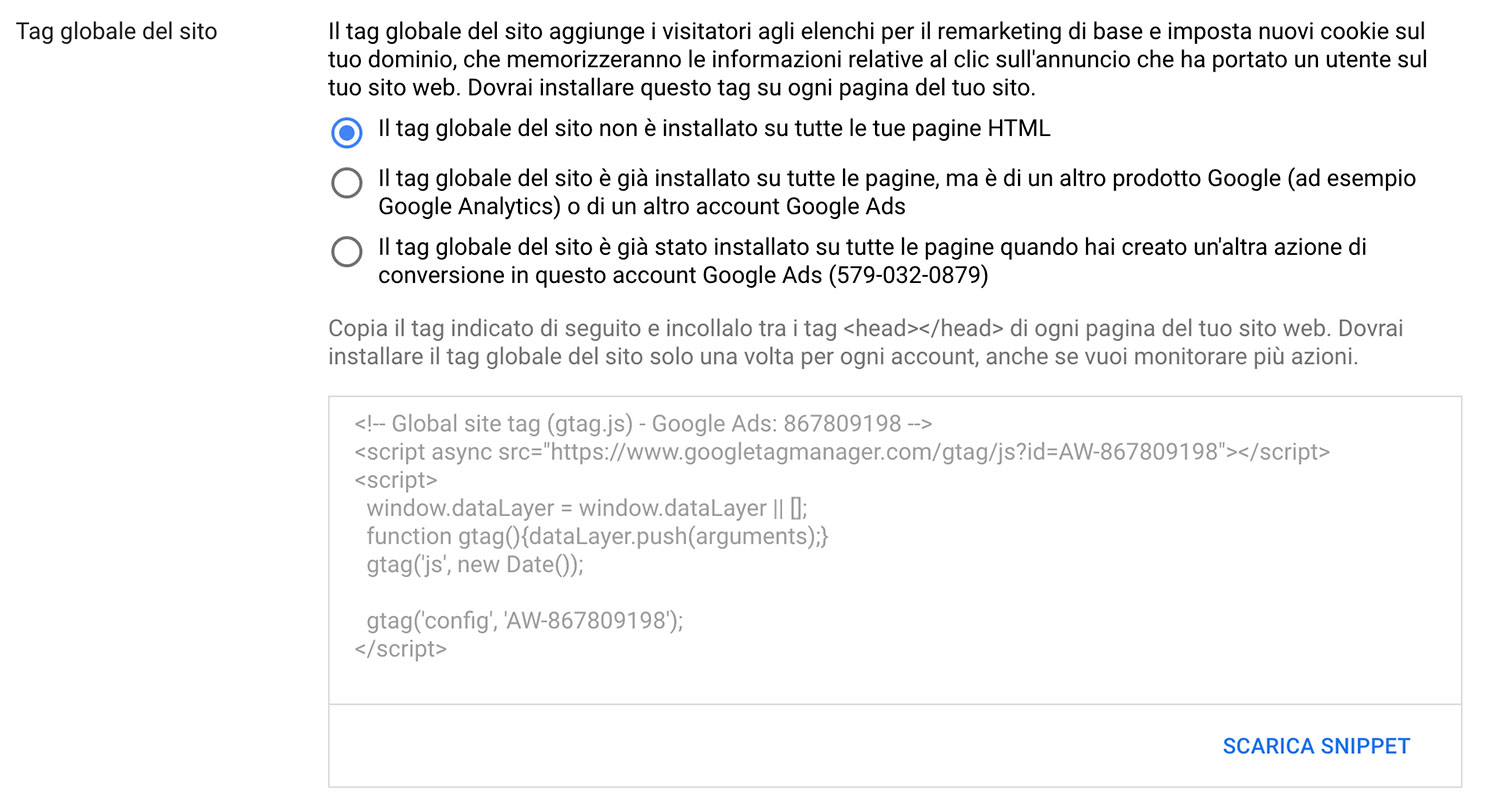
Case 1: You did not install Google Analytics, or you installed the old "Classic" version
In this case, select the first option:
"global site tag is not installed on all html pages"

You'll see some pretty meaty code to enter. Copy it all, and go back to your website, in the Google Ads cookie configuration.
Select the "Raw" code entry and enter the code as is within the "Html Raw Code" field.
You should find something like this:

Before saving, add the instruction to anonymize the data to the last line of code.
The last line will then change from so:
gtag('config','AW-000000000);
to so:
gtag('config','AW-000000000,{ 'anonymize_ip': true });
At this point you can save and publish the Cookie by pressing the blue "Publish" button in the upper right corner.
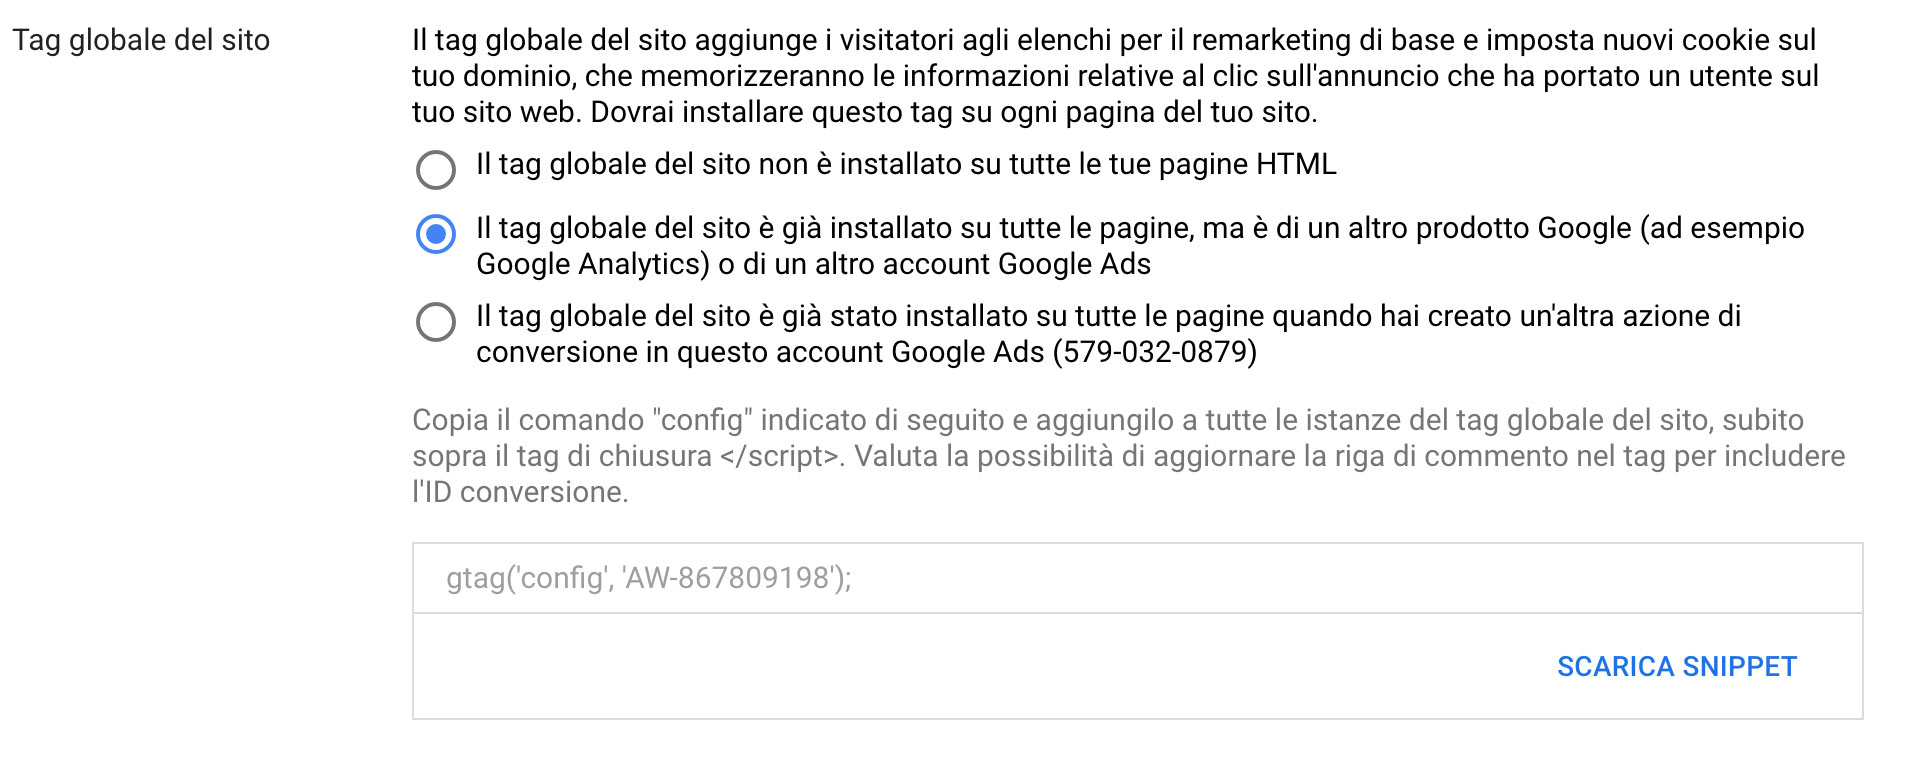
Case 2: You have Google Universal Analytics or Google Analytics 4 installed.
In this case, proceed in the configuration of your conversion on Google Ads, selecting the option:
"the global site tag is already installed on all pages, but from another Google product (e.g. Google Analytics) or from another Google Ads account"

As soon as you select this option you will see that the code to be entered will be reduced to a single line:
gtag('config','AW-000000000);
Now all you have to do is go back to your site, in the Google Ads cookie configuration, select the "Javascript + noscript" code entry and enter that line of code inside the "Javascript Activation Code" field.
This is what you should see:

Before saving, add the instruction to anonymize the data.
The last line will then change from so:
gtag('config','AW-000000000);
to so:
gtag('config','AW-000000000,{ 'anonymize_ip': true });
At this point you can save and publish the Cookie by pressing the blue "Publish" button in the upper right corner.
Part 4 - the conversion monitoring code
Continuing on to Google Ads, in your conversion setup, you will also see the conversion tracking code.
This code should be inserted directly within the page where you want Google Ads to track conversion (e.g., the thank you page after purchasing, or after filling out a contact form).
As anticipated, this code will not work unless the global code, the one found throughout the site, is activated first.
So now, after you have entered the global code on the site with MyAgilePrivacy and installed the conversion tracking code where you need it, all that's left is to check how it works.
Part 5 - verification of correct operation
Now all you have to do is check whether you have correctly installed Google Ads on your website.
If you load any page on your website you will see that Google Ads global tracking does not start until you expressly consent to the cookie's installation, either by clicking "I agree" on the cookie acceptance bar, or by going to "Customize" and enabling the cookie.
Similarly, the conversion will not be tracked if you have not first consented to the execution of the global Google Ads code.


